
Last update: 28. April 2026
Have a look at our guides for FortiOS 7.4, FortiOS 7.6 and FortiOS 8.0.
In our daily support work we often see FortiGates in use on which the basic settings like time zone, host name and so on have never been set correctly. Therefore we would like to provide you with a small guide on this page, with which you can adapt a new FortiGate to your needs in no time and define the most basic settings right at the beginning.
There is a newer version of this guide for FortiOS 7.4 available:
Please note that this guide does not apply if you are using a FortiManager to manage your FortiGate. In this case, this guide can only give you a small overview of the decisions and configurations you may want to implement.
Step 1: Lowest level configuration
As first step, let’s set the very basic system settings. We recommend you to set this configuration settings even before activating VDOMs or configuring something else, as this makes our life easier.
Open the WebGUI, go to “System” and then to “Settings”. Check all settings on this page and change all the location specific, security relavant or system specific settings like:
- Hostname
- Timezone
- HTTP & HTTPS Ports
- SSH & Telnet Ports
- USB auto-install
- Email service settings
Some global settings that may be interesting to you can only be made on the CLI. Have a look at those settings:
config system global
   # You can create so named "revision backups" automatically every time an administrator session ends.
   set revision-backup-on-logout enable
   # To enable or disable auto-back up of the config when firmware is upgraded:
   set revision-image-auto-backup enable
   # You can disable telnet
   set admin-telnet disable
   # It may also be interesting to remove the alias, which can reveal our FGT model in use
   unset alias
end
Ensure, that your FortiGate is allowed to use FortiGuard update servers that are located outside of the USA (this is set to “automatic” per default):
config system fortiguard
   set update-server-location {eu/usa/automatic}
end
Step 2: Configuration of the log settings
If your FortiGate has a harddisk, you may want to use it as log storage:
config system global
   set disk-usage log
end
config log disk setting
   set status enable
   set diskfull overwrite
end
config log disk filter
   set severity information {emergency, alert, critical, error, warning, notification, information, debug}
end
Please also review, if the default 7 day log retention period is sufficient for your setup. You may want to extend the maximum-log-age setting:
config log disk setting
   set maximum-log-age 7
end
Step 3: Admin Settings
Configure a new administrative user (whole new username and password; with two-factor authentication enabled, with a very strong password, with trusted hosts enabled). Two factor authentication will not work anymore, if the time of your FortiGate is not correct. Therefore, we suggest to create also a second emergency administrator with very strict trusted hosts and without two factor authentication.
We highly recommend to disable any administrative access (HTTP/HTTPS/Telnet) on interfaces connected to insecure networks. It is recommended to configure management interfaces for management access if not already done by Fortinet (FortiGate default configuration if mgmt interfaces are available).
Logout with the admin user, login with the new user and disable the original “admin” account so no one can use it anymore. This step should be taken to prevent possible attackers from attacking the default user. You can also delete the old “admin” account:
config system admin
   del "admin"
   next
end
You may want to create an notification email everytime an administrator logs in successfully. You can realize this by creating a new automation stitch in the Security Fabric for the event log ID 32001 (LOG_ID_ADMIN_LOGIN_SUCC)
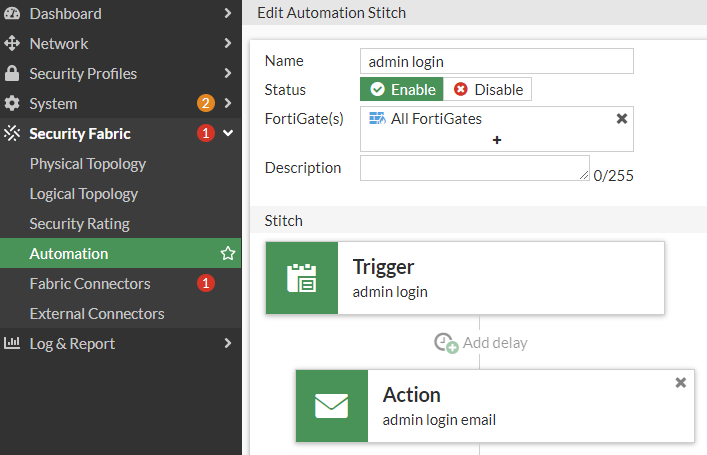
As soon as this Automation Stitch is configured, you will receive an emal notification everytime an administrator logs in to your FortiGate. This is also the case if a hacker somehow was able to enter your system with stolen credentials.
Tipp: There is also an option to notify for configuration changes. You may think about enabling those notifications too.
Step 4: Wifi default country
What you define here will be taken as default if you create any new wireless profile.
config wireless-controller setting
   set country CH
end
Step 5: Administrative Management Interfaces
We recommend our customers to use out-of-band (oob) management interfaces. This way you can have a clean line between traffic handling parts and management parts of your FortiGate.
If you want to build an HA cluster at the end, please priorize the step “Build your HA cluster if needed” and do this now. As soon as you open the HA settings, you will be able to configure dedicated management interfaces in the cluster settings. So if you plan to setup your FortiGate in a cluster, do this now.
If you choose to use VDOMs at the end, please follow to the next step. You may want to consider a dedicated management VDOM.
Step 6: Show needed features
Open the page Feature Visibility under System in the GUI and enable the visibility of all features that you want to see in the WebGUI.
I personally always enable all settings. Keep in mind: This setting does not enable or disable a feature. It only hides or shows the features in the Web GUI. You can still configure it on the CLI.
Step 7: Do you need VDOMs?
If you want to use VDOMs, the time has come to enable VDOM management on the FortiGate:
config system global
   set vdom-mode multi-vdom
end
Step 8: Configuration of SD-WAN
On FortiOS 7.2, the SD-WAN Features has got a lot of useful features. Thefore we recommend you to implement SD-WAN on a new configuration from scratch. Moving to SD-WAN afterwards needs a littlebit more time and effort even if there is a migration tool available in FortiOS 7.2.
Step 9: Configuration of network interfaces
In this step it is time to configure your Network interfaces. This also includes DHCP servers on interfaces where it is required.
Do not forget to disable all administrative access where it is not needed. We also recommend to set static ip addresses on the FortiGate instead of acquiring DHCP ip addresses on the FortiGate.
In this step you will decide if you enable a static interface natively or if you create a hardware switch to extend the amount of ports of the switch more easy in future.
Also, you may want to configure VLANs in this step. If your FortiGate is running in transparent mode, do not forget to set the forward domain on VLAN interfaces.
Step 10: Set the correct MTU
The default MTU for a FortiGate interface is 1500 bytes. It is very important to set the correct MTU for all interfaces. Whether you have to lower or increase the MTU is irrelevant; it’s equally important in both cases. Failing to change the MTU may cause sporadic connection problems, fragmentation and performance issues, and may even result in packet loss in some cases.
config system interface
    edit wan
        set mtu-override enable
        set mtu 1500
    next
end
Step 11: Configuration of Blackhole Routes
If you are using private IPv4 Networks, you may consider implementing blackhole routes for those subnets. This prevents the FortiGate from sending out traffic to an internal destination address over the WAN interfaces. Blackhole routes can look like the following example:
config router static
    edit 0
        set dst 10.0.0.0 255.0.0.0
        set distance 254
        set comment "Blackhole 10.0.0.0/8"
        set blackhole enable
    next
    edit 0
        set dst 192.168.0.0 255.255.0.0
        set distance 254
        set comment "Blackhole 192.168.0.0/16"
        set blackhole enable
    next
    edit 0
        set dst 172.16.0.0 255.240.0.0
        set distance 254
        set comment "Blackhole 172.16.0.0/12"
        set blackhole enable
    next
end
Please also add blackhole routes for any other networks in use. To determine whether a network requires a blackhole route, simply ask yourself: ‘If the interface to that network were down, would I want this traffic to be sent out via a default route?’ (Or any other matching route)
Step 12: Reverse path forwarding check
By default, the RPF (reverse path forwarding) check on the FortiGate is set to “loose”. If you need a more restrictive spoofing filter, you may want to set the RPF check to “strict”.
Because of the importance of this topic and since it is security relevant, Fortinet has created a dedicated KB article describing the FortiGate RPF check and its options. You can find the KB article here.
Step 13: Configuration of network zones
To simplify your configuration, you may decide to use network zones. A network zone contains multiple interfaces. Instead of configuring a lot of firewall policies from interface to interface, you can instead create only one policy from a zone to another zone and this one policy contains all interfaces “grouped” together in the zones.
Step 14: Configuration of DNS Servers
You have to consider which DNS resolvers you want to use. The default value on the FortiGate are the FortiGuard DNS servers.
Other frequently used options are DNS servers provided from your Internet provider or other public DNS servers like the one (got it?) from cloudflare or the eight from google or the nine from quad9.
Please respect, that a lot of bigger service providers like azure, aws, cloudflare, google and so on are doing DNS based load balancing. Sometimes they use DNS based load balancing methods. Note, that you may not get the best result for your location if you are using DNS servers that are located far away from your location.
Step 15: Build your HA cluster if needed
Please note, that the MAC addressing of you FortiGate change as soon as you enable the HA feature. Therefore, if you are experiencing problem with modems or switches, please consider to turn them off for a minute (to flush the MAC table) and plug them back in afterwards.
Please do not forget to enable the session sync feature. You can find more information in this KB article.
config system ha
   set session-pickup enable
   set session-pickup-connectionless enable
end
Step 16: Configuration of IPSec Tunnels
Now it’s time to configure your IPSec Tunnels.
If possible, use the FortiGate IPSec wizard. The wizard will create address groups, static routes and all needed tunnel configuration automatically for you.
Since IPSec can be hardware accelerated and has less overhead then SSL-VPN we recommend to use IPSec VPN wherever possible.
Step 17: Configuration of SSL-VPN
If you were not able to satisfy all remote access requirements with IPSec, you may decide to dodge to SSL-VPN.
Please do not forget to harden your SSL-VPN Setup. In this guide you will learn how to harden your SSL VPN.
Step 18: Is there a need to disable the SIP support features?
If your provider requires to disable SIP session helper or VOIP ALG features, you may want to do this at this point. You can find a good manual on how to do so located in our blog if you click here.
Step 19: Configuration of UTM profiles
Before we create our firewall policies, we can now create the needed UTM profiles we will later apply on our firewall policies.
Step 20: Configuration of firewall policies
The second last step is now to configure our firewall policies as we need them.
Step 21: FortiAnalyzer or FortiGate Cloud Connection
If you have a FortiAnalyzer, it is now time to configure your FortiAnalyzer.
The same applies if you wish tho use FortiGate Cloud.
Step 22: Customize the blockpage logo
By default, the FortiGate shows the Fortinet logo on blockpages. This may confuse some users. Therefore we recommend to replace this logo with your company logo. You find this setting located in WebAdmin GUI -> System -> Replacement Messages -> Manage Images.
Step 23: Configuration backup & reboot
As the last step we recommend you to create a global configuration backup of your FortiGate and reboot the appliance once.
exec reboot
Step 24: Harden your FortiGate configuration
Fortinet has published a FortiOS hardening guide. We recommend to work through the guide to harden your system. You can find the guide under https://docs.fortinet.com/document/fortigate/7.2.0/best-practices/555436 .
Configuration best practices
Fortinet has released a best practices guide for FortiGates. You can find the guide for FortiOS 7.2 under https://docs.fortinet.com/document/fortigate/7.2.0/best-practices .
![]()

Nur zur Info:
Den folgenden Befehl scheint es nicht mehr zu geben (auf 7.2.8)
set gui-lines-per-page
Guten Tag Stephan
Vielen Dank für den Input, ich habe die Einstellung aus der Anleitung entfernt.
Freundliche Grüsse
Vom Boll Tech Team