Limited throughput on network devices is a common problem. We handle a lot of cases with thtroughput issues and have written a guide on how we recommend to start troubleshooting in such cases.
Please let us know if you like this article or if you find anything missing in the comments below.
Step 1: Also known as “the prerequisites”
Please ensure, that you have made the testing right. The most throughput problems we see here in the support department at Boll Engineering, are not throughput issues on the FortiGate side. Often the test administrator administering the test just does it wrong, resulting in unreliable results.
Therefore, we recommend to test by using multiple different tools (FTP, SMB, iperf, HTTP, …). This is even more important if you are using iperf since the handling of iperf is not as simple as one may expect.
Ensure, that there are no devices between your test devices and the FortiGate to be sure, that no other traffic than your test traffic is flowing. This ensures precise and reliable results of your tests.
We absolutely recommend you to do all of the below steps during a planned maintenance window to prevent any unwanted interruptions in your setup.
Step 2: How much traffic is your model able to forward?
Every hardware or VM model has it’s own limitations according to the hardware specifications. Those values are on one side limited amounts of elements like address objects, routes, tunnels, and so on. On the other side there are limitations on the number of new sessions per second and a limit in throughput of traffic with different UTM functions enabled.
The maximum values per FortiGate Model and Software version are documented in the Maximum Values Table for FortiGate.
The maximum throughput values are documented in the datasheet of the selected FortiGate model. You can find the datasheets linked on the red “PDF” button on our website in the model overview.
Step 3: Check the wiring
Faulty or incompatible cables are a very frequent cause for throughput issues in networking equipment. Our recommendation is to test the connections with new cables, that are suited for the job. Please use cables that meet or exceed the required specifications for your setup.
Please also ensure, that the correct routing is being used. If the traffic is sent out through a 50mbit/sec DSL link instead of a 1gbit/sec fibre connection, this also has a performance impact.
Step 4: Check the interface statistics
If you find a large amount of errors or drops on an interface you may want to have a deeper look into it.
You can analyze the counter values by using the following CLI commands:
fnsysctl ifconfig
get hardware nic interface1
diagnose ip router command show show int
diagnose netlink device list
To rule out any hardware issues it is possible to execute a HQIP (hardware quick inspection package) test on the FortiGate. The test does generate load on the system and analyzes the throughput to compare if there is a problem on the FortiGate.
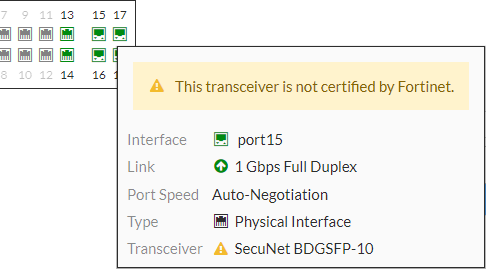
Step 5: Check if the transceiver is a supported module
FGT # get system interface transceiver
Interface port15 - SFP/SFP+ (1.3G)
  Vendor Name  :            SecuNet
  Part No.     :            BDGSFP-10
  Serial No.   :            ##############
Interface port16 - SFP/SFP+ (1.3G)
  Vendor Name  :            SecuNet
  Part No.     :            BDGSFP-10
  Serial No.   :            ##############
Interface port17 - SFP/SFP+ (1.3G)
  Vendor Name  :            SecuNet
  Part No.     :            BDGSFP-10
  Serial No.   :            ##############
Interface port18 - SFP/SFP+ (1.3G)
  Vendor Name  :            SecuNet
  Part No.     :            BDGSFP-10
  Serial No.   :            ##############

                                       Optical      Optical      Optical
SFP/SFP+     Temperature  Voltage      Tx Bias      Tx Power     Rx Power
Interface    (Celsius)    (Volts)      (mA)         (dBm)        (dBm)
------------ ------------ ------------ ------------ ------------ ------------
port15        57.7         3.35        31.86         -6.1         -4.1
port16        60.1         3.36        31.16         -6.1         -4.9
port17        58.2         3.38        29.21         -6.0         -9.4
port18        63.9         3.36        27.57         -6.1        -12.1
++ : high alarm, + : high warning, - : low warning, -- : low alarm, ? : suspect.
Even if a Transceiver is not certified by Fortinet it may work fine. But in some cases those uncertified transceivers cause problems. Therefore those transceivers may be subject to replace for testing.
Step 6: Manually set the interface duplex mode and speed
On some models, you need to configure how you want to use a port.
Here you can find a KB article from Fortinet on how to change the interface speed.
config system interface
   edit interface1
      set speed 1000full
   next
end
Step 7: Check the MTU
If you are not a specialist in determining and reverse engineering the MTU sizes of a connection, please consult the datasheet or the documentation of your internet connection. Your provider is able to recommend you the best MTU value for it’s infrastructure and protocols in use.
config system interface
   edit "interface1"
      set mtu-override enable
      set mtu 1400
   next
end
Step 8: Remove any bandwith limitations set on an interface
Check this setting on all interfaces that the traffic passes through. The best solution is to use this CLI command to locate where this setting is set:
sh full | grep 'inbandwidth\|outbandwidth' -f
To set the limitation back to unlimited, you need to set the value back to zero as in this example for interface1:
config system interface
    edit "interface1"
        set inbandwidth 0
        set outbandwidth 0
    next
end
There is a documentation with more information located here.
Step 9: Disable traffic shaper policies
You can enumerate if you have any traffic shaping policies configured by using the CLI command:
show full-configuration firewall shaping-policy
If you have any traffic shaping policies enabled, we recommend you to disable the policies for testing. Please ensure that you do this during a planned maintenance window to prevent interruptions in your productive environment.
Step 10: Remove any UTM profiles from the Firewall policy
Also. please ensure to switch the firewall policy to flow based, since proxy based policies can not be offloaded to the hardware chipsets of the FortiGate.
Step 11: Check the hardware acceleration status
In our blog post to this topic you can find all the relecant information and steps to check if the hardware acceleration (or even disabled hardware acceleration) is causing throughput issues on your FortiGate.
As soon as hardware acceleration is disabled for some or all traffic, the load of the FortiGate will rise. Hardware offloading takes load from the CPU of the FortiGate to be computer by special crafted processors with a dedicated task. This makes traffic processing faster and lowers CPU load at the same time.
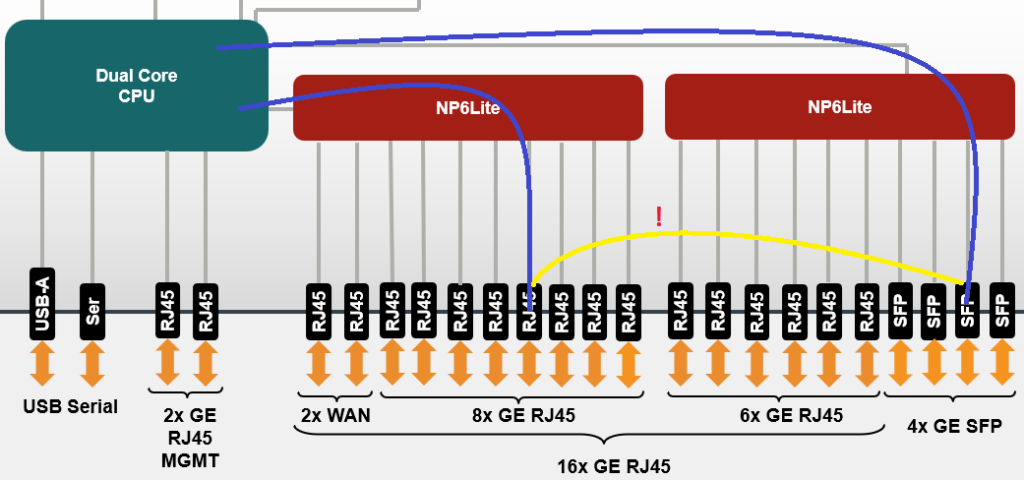
Step 12: Is the traffic routed between two NP chipsets?
In some FortiGate models, there are multiple NP chipsets built in. In some cases those chipsets are connected over an inter-NP connection which has in most cases 10gbit/sec or more of bandwith. Other FortiGate models don’t have such direct interconnections. In this case, the traffic has to flow over the CPU of the FortiGate what causes a higher CPU load on the unit. Therefore we recommend to configure the FortiGate accordingly to reduce the traffic flowing over the CPU.

Step 13: Duplicate mac addresses in the layer 2 network
Duplicate MAC addresses in a network lead to switchtable flapping what causes throughput issues and may even cause interruptions. This problem can be best analyzed by sniffing the ARP packets or looking into the log of your switches.
diag sniffer packet any 'arp' 3
Step 14: Is the traffic going over a PPP interface or a software switch?
With the following CLI command you can check if you are using PPPoE interfaces which cannot be offloaded as well:
show system interface | grep "mode pppoe" -f
Please note, that the “modem” interface is a FortiOS default value that in most cases is not in use anywhere.
Any kind of PPPoE interface and all subordinate interfaces like VLANs on PPPoE Interfaces are not supporting hardware acceleration at all.
Step 15: Enable NAT on the firewall policy for testing
We have seen some rare cases where router have had problems (or let’s say “increased processing times”) with traffic that way not coming from the same network that the router was attached to. Even if the router had a valid router to the destination network, processing of traffic for the network that was not directly attached, was slower. By enabling NAT, the traffic is coming from a “local attached” subnet for the router and therefore traffic flows faster.
We do not recommend this as a permanent solution. Instead a troubleshooting has to be done and the problem source has to be located and resolved.
More information sources:
Fortinet’s troubleshooting guide
The FortiGate built-in iperf test
![]()

