
Since the introduction of iCloud Private Relay, we have received numerous questions—ranging from how it works to its impact on users and businesses. Now, about a year later, we have decided to publish a detailed blog article explaining its proper use and highlighting key aspects. In this post, you’ll learn how iCloud Private Relay works, the benefits it offers, and what you should be aware of.
What is iCloud Private Relay?
iCloud Private Relay is a privacy service from Apple that hides users’ IP addresses and internet traffic to prevent tracking by networks and websites. According to Apple, requests are routed through two separate proxies – one operated by Apple and one by a third-party provider – ensuring that neither Apple nor the destination server can simultaneously see both the IP address and the accessed content (such as the names of the destination servers).

This protects users from fingerprinting, prevents unwanted location tracking, and enhances security for unencrypted HTTP traffic. Private Relay is integrated into iOS, iPadOS, and macOS and works automatically for iCloud+ subscribers when enabled. Businesses and schools can block the feature if they require full network control. Those who do not subscribe to iCloud+ cannot use this feature but are also not affected by the potential limitations it may bring.
Sounds great… So, what’s the problem?
Keep in mind that the Private Relay feature also limits your ability to control what Apple users can do within your network. Since all their traffic is encrypted and routed through Apple, you can no longer monitor which websites they visit – including potentially illegal or inappropriate content. Proxy services are often blocked for security reasons, and the same applies to Private Relay.
The feature automatically detects when Private Relay cannot be used and disables it system-wide on the device. However, this process can take some time. Until the block is recognized, the end user will have no access to the internet. To ensure the detection process is completed quickly, a one-time manual adjustment during the configuration is recommended.
What should firewall administrators do now?
First and foremost, it must be decided whether Apple’s Private Relay function will be allowed within the network or not. Depending on the decision, different actions need to be taken.
Allow Private Relay
If you have DNS or web filtering enabled, it is likely that proxy servers are blocked for security reasons. In this case, you can either override the categorization of the following servers or create a new firewall rule that allows traffic to the Relay servers without applying security inspection. The following objects can be used for the second proposal:
1. Creating address objects:
config firewall address
	edit "iCloudRelay_captive.apple.com"
		set type fqdn
		set fqdn "captive.apple.com"
	next
	edit "iCloudRelay_gateway.icloud.com"
		set type fqdn
		set fqdn "gateway.icloud.com"
	next
	edit "iCloudRelay_mask-api.icloud.com"
		set type fqdn
		set fqdn "mask-api.icloud.com"
	next
	edit "iCloudRelay_mask.icloud.com"
		set type fqdn
		set fqdn "mask.icloud.com"
	next
	edit "iCloudRelay_mask-h2.icloud.com"
		set type fqdn
		set fqdn "mask-h2.icloud.com"
	next
end
2. Creating an address group:
config firewall addrgrp
    edit "iCloudRelay"
        set member "iCloudRelay_captive.apple.com" "iCloudRelay_gateway.icloud.com" "iCloudRelay_mask-api.icloud.com" "iCloudRelay_mask-h2.icloud.com" "iCloudRelay_mask.icloud.com"
    next
end
3. Creating a firewall rule:
The address group can then be used as a destination within a firewall rule. Make sure that the traffic flows through the newly created firewall rule by placing it higher than other applicable firewall rules.
Prohibit Private Relay
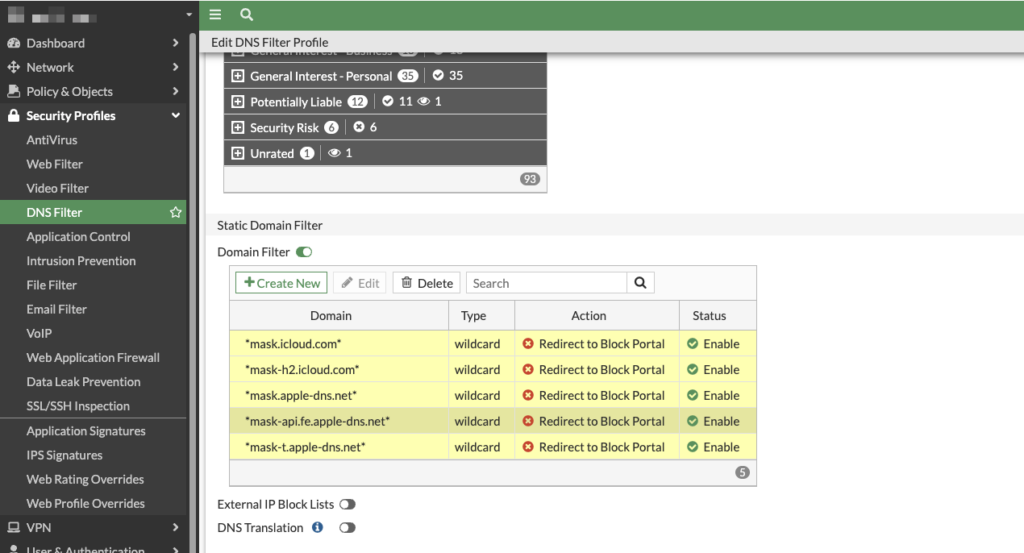
If Private Relay is not allowed, a DNS filter should be set up to block the resolution of Relay servers. This forces the Apple device to connect directly to the target servers without using proxies. To achieve this, the following wildcard filters can be created in the respective DNS filter profile:
- *mask.icloud.com*
- *mask-h2.icloud.com*
- *mask.apple-dns.net*
- *mask-api.fe.apple-dns.net*
- *mask-t.apple-dns.net*
Then, your DNS-Filter should look like this:
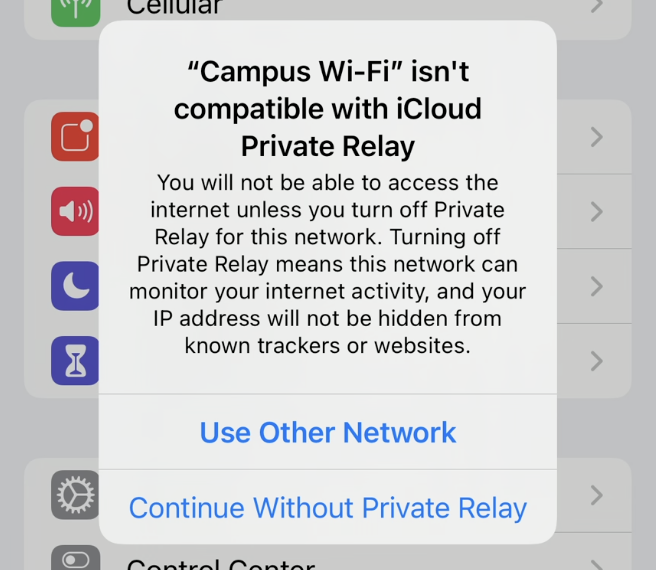
You will then see the following message either in the Private Relay settings or as a pop-up notification:
Useful Links:
![]()
Hello Boll,
Thank you for this interesting article. We have been struggling with this issue for a while. 🙂
One question regarding Allow Private Relay:
How should the policy be configured?
– Service ALL or just HTTPS?
– With certificate-inspection or without?
– AV -> yes
– Web- and DNS Filter -> none
Any recommendations?
Dear Philippe,
Thank you for your comment on our blog.
In this case, to allow private relaying, the service is defined by Apple. You can find that information linked in the article: https://developer.apple.com/icloud/prepare-your-network-for-icloud-private-relay/. Specifically, “iCloud Private Relay uses QUIC, a new standard transport protocol based on UDP. QUIC connections in Private Relay are set up using port 443 and TLS 1.3, so make sure your network and server are ready to handle these connections.”. Neither “ALL” nor “HTTPS” is correct; the correct port/protocol combination is UDP 443. Since you cannot inspect the traffic, you must use “no-inspection.” Since SSL deep inspection is not possible, AV inspection is also not possible. The same applies to web and DNS filter profiles. A web or DNS filter may block the traffic because of the “proxy” category.
Best regards from the
Boll Tech Team
Guten Tag
Vielen Dank für den Artikel! Wir haben das gleiche Problem, dass wir PrivateRelay nicht zulassen möchten. Wir haben es wie im Artikel umgesetzt aber unser Log füllt sich weiterhin mit Blocks auf gateway.icloud.com(TCP/443). Müssen wir dies auch auf diesen DNS Filter setzen oder ist das etwas anderes?
Wir haben zudem auf Application Control QUIC Blockiert.
Vielen Dank für die Rückmeldung
Freundliche Grüsse
Levin
Dear Levin
Thank you for your comment.
We do not provide support on our blog. Please open a support ticket in our partner area, we are happy to help you with your question.
Have a nice day.
Kind regards from the
Boll Tech Team
I’m having trouble with this even though my Macs are not using Private Relay. I’m not a network engineer, and I am trying to make Forticlient and our PAC Proxy work with the Macs…well, they do work, just not Safari. All other browsers are respecting the proxy, but not Safari.
No Provate relay, and I turned off as many Apple network options as I can. Wiped Mac clean with nothing on it, still can’t use the PAC proxy.
Any ideas? I’ve run out of things I can think of…good info though.
Dear blog reader,
Thank you for your comment.
Please note that we do not provide technical support on our blog. Please open a support ticket with your Fortinet partner or the Fortinet support department directly.
Have a nice day.
Kind regards,
The Boll Tech Team