
The good news first: If you’re currently using the FortiClient to establish a Dialup IPsec VPN (Aggressive, PSK based), the same configuration should also work with the native macOS client.
Because the native macOS client doesn’t offer advanced parameters, the configuration is straight forward:
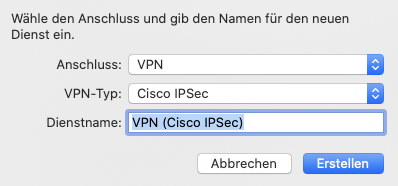
- Add a new network connection of the type “Cisco IPsec”
- Configure the server address and username
- Enter the Preshared Key (PSK) and optionally the Peer ID in the authentication options
Limitations
- When using two factor authentication (e.g. FortiToken), Challenge-Response isn’t supported. You have to concatenate the code directly after the password (without any separator character).
- For certificate based authentication (PKI), the tunnel must operate in main mode
- If using PKI, the FortiGate must present a valid certificate (macOS does check the FQDN and trust state)
Troubleshooting
The following steps were performed using macOS 10.15.7 and FortiOS 6.4.4.
In case you’re out of luck, the following information will help you to adjust the parameters of the IPsec Tunnel on the FortiGate. The same procedure can be used to identify the parameters of any IPsec client.
A Wireshark capture (udp.port == 500) of the initial connection reveals the phase 1 proposals of the IPsec client.


| Phase 1 | Proposal 1 | Proposal 2 | Proposal 3 | Proposal 4 |
| Lifetime | 3600s | 3600s | 3600s | 3600s |
| Encryption | AES256 | AES256 | AES256 | AES256 |
| Authentication | SHA2-256 | SHA | MD5 | SHA2-512 |
| DH | 14 (2048 bit) | 14 (2048 bit) | 14 (2048 bit) | 14 (2048 bit) |
As the Phase 2 is encrypted by the Phase 1, we’ll have to decrypt this data in Wireshark (you could also grab them from the debug output, but it’s less fun). So let’s crank up the debugger on the FortiGate to grab the Cookie and Encryption key:
diagnose debug enable
diagnose debug application ike -1
...
ike 0:ike1-psk:17: ISAKMP SA 7bc53255dc4cee9f/a599780979bee8c2 key 32:C727EC26DE35627C47E006A96039AB3B877A95A00132B7B16709A78709E46EAA
...
Now we head to the Wireshark preferences and put this information into Protocols > ISAKMP > IKEv1 Decryption Table.

Wireshark will now reprocess the captured data an reveal the previously encrypted data.

| Phase 2 | P1 | P2 | P3 | P4 | P5 | P6 | P7 | P8 | P9 |
| Lifetime | 3600s | 3600s | 3600s | 3600s | 3600s | 3600s | 3600s | 3600s | 3600s |
| Encryption | AES256 | AES256 | AES256 | AES128 | AES128 | AES128 | 3DES | 3DES | 3DES |
| Authentication | SHA2-256 | SHA | MD5 | SHA2-256 | SHA | MD5 | SHA2-256 | SHA | MD5 |
| DH | 14 | 14 | 14 | 14 | 14 | 14 | 14 | 14 | 14 |
Sample Configuration
config vpn ipsec phase1-interface
  edit "ike1-psk"
    set type dynamic
    set interface "port1"
    set mode aggressive
    set peertype one
    set net-device disable
    set mode-cfg enable
    set proposal aes256-sha256
    set dpd on-idle
    set dhgrp 14
    set xauthtype auto
    set authusrgrp "vpn"
    set peerid "ike1-psk"
    set ipv4-start-ip 172.21.1.101
    set ipv4-end-ip 172.21.1.200
    set dns-mode auto
    set ipv4-split-include "server address"
    set psksecret ENC xyz
    set dpd-retryinterval 60
  next
end

config vpn ipsec phase2-interface
  edit "ike1-psk"
    set phase1name "ike1-psk"
    set proposal aes256-sha256
    set dhgrp 14
  next
end